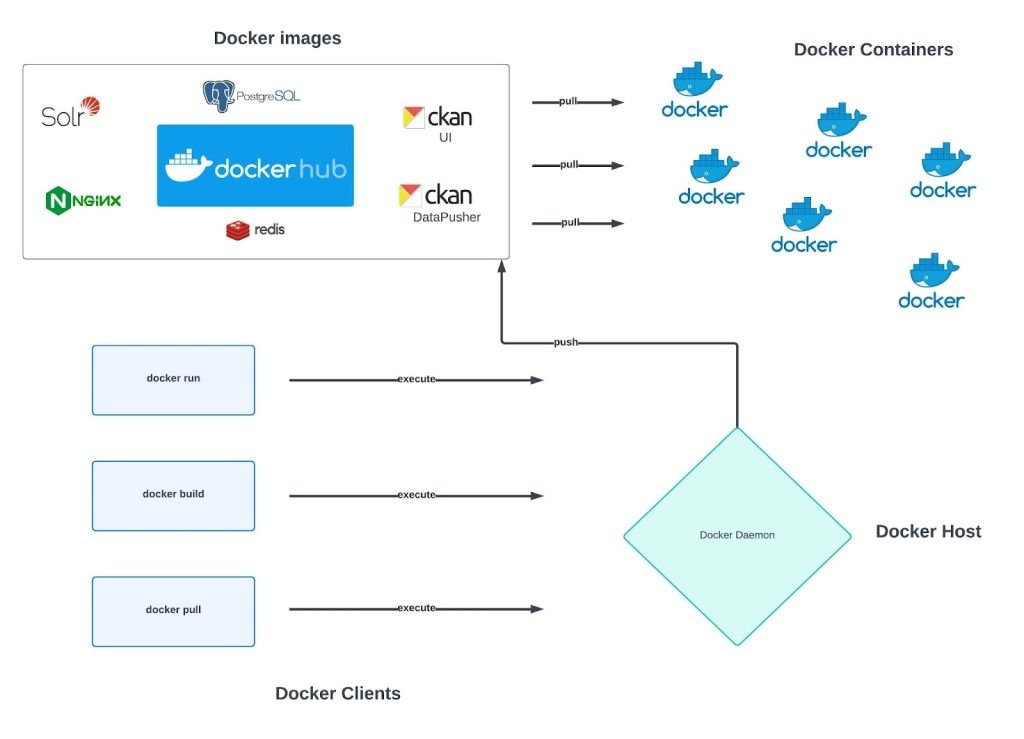
The CKAN ecosystem can be installed in 3 different ways.
- Install from an OS (Debian) package
- Install from source
- Install as Docker Containers using Docker Compose
It seems that more and more these days CKAN running as containers is the preferred method for Production and Development CKAN environments. Having one container per service is the architecture that seems to cover most application needs. Its simplicity and ability to take advantage of quickly upgrading to new CKAN releases, however small, is a huge drawcard.
In addition to its convenience and flexibility, deploying CKAN as Docker containers offers numerous benefits for both production and development environments. With each service encapsulated within its own container, the architecture ensures better isolation, potential scalability, and easier management of dependencies. Furthermore, Docker’s inherent portability facilitates smooth deployment across various environments, enabling developers to replicate configurations effortlessly and streamline the deployment process. This approach not only simplifies the deployment of CKAN instances but also enhances the overall agility and robustness of the ecosystem, empowering organisations to adapt swiftly to evolving requirements and leverage the latest CKAN features with minimal effort.
In theory, as a developer, you could implement local modifications to a deployable CKAN image when your development environment’s architecture differs from that of the testing and production environments
CKAN as Docker Compose Services
The CKAN software stack is currently made up of 6 Docker Compose Services
- NGINX
- CKAN
- Database
- Solr
- Redis
- DataPusher
These services each run in their own Docker container and thus can be upgraded or changed in some way separately from one another

In the diagram, the Docker Host can be of any computer architecture. I personally use Mac OS for day-to-day work and Ubuntu 22.04 virtual machines for testing.
Installation
I’m assuming you already have the Docker Engine software installed on your host machine. If not, you can use the information in this guide: https://docs.docker.com/engine/install/ to get it installed.
The first thing that needs to be done is downloading the CKAN Docker repository (ckan-docker)
git clone https://github.com/ckan/ckan-docker
This will create a ckan-docker directory. Within this directory you will need to do the following:
- cp .env.example .env (create an environment file)
The .env file is where specific changes can be made to environment variables e.g. a database connection string
- docker compose build
For each service defined in the Compose file (docker-compose.yml) this command will build the local image if the service definition includes the “build” command. Some services will just run a container directly from a remote image i.e.: an image from a docker repository (eg: DockerHub)
Docker builds the Docker image in layers, based on the instructions in the Dockerfile. Each instruction in the Dockerfile (e.g., RUN, COPY, ADD) creates a new layer in the image. Docker caches intermediate layers to improve build performance, so if a Dockerfile hasn’t changed since the last build, Docker can reuse previously built layers, saving time and resources.
Docker executes each instruction in the Dockerfile sequentially, performing tasks such as installing dependencies, copying files into the image, setting environment variables, and configuring the container environment.
Once the build process completes successfully, Docker assigns a tag to the newly created image based on the service name and any specified tags in the Compose file.
- docker compose up
This command will run containers off those images. Each service will then have an associated container running. The services can also have relationships between each other. These links will be established during this command too. The Compose file (docker-compose.yml) file also defines the networks, container dependencies, healthchecks and the volumes used for CKAN and the other containers.
While the services are starting, Docker Compose streams the output (logs) of each service to the terminal. You can see the logs of individual services and monitor their initialization process. Once all services have been successfully started, Docker Compose keeps them running in the background, allowing them to serve requests or perform their designated tasks. If any service encounters an error during startup, an error message is displayed, and stop is made to the affected service.
This installation can take a while (5-10 minutes) if none of the local images exist before starting. Subsequent re-builds or stopping/starting containers can take advantage of the caching in Docker installs, and the time to get the whole CKAN system running can be dramatically reduced
The end result is 6 containers running:

Development Mode
There are 2 types of environments or modes – base mode and development mode. If you are a developer, you may want to install CKAN in Development mode. This mode makes it easier to get started for the development of new CKAN extensions and to make updates to CKAN core code. It uses the base mode CKAN image as the foundation and adds additional layers that a typical developer would require i.e.: instals development dependency libraries, creates a CKAN extension location (directory) on the filesystem.
There are separate Docker Compose and Dockerfiles for Development mode. For instance, you would run the following command to build a Development environment:
- docker compose -f docker-compose.dev.yml build
And the following command to start the containers:
- docker compose -f docker-compose.dev.yml up
Customising (extending) your local image
To perform extra initialization steps, you can add scripts to customise your local images and subsequent containers. Copy these scripts to the /docker-entrypoint.d folder (The folder should be created for you when you build the image). Any *.sh and *.py file in that folder will be executed just after the main initialization script (prerun.py) is executed and just before the web server and supervisor processes are started. The sequence in which the scripts execute follows a lexical order.
NGINX
The foundational Docker Compose configuration employs a NGINX image (container) as the front-end, serving as a reverse proxy. HTTPS functionality operates on port 8443 within this setup. This of course can be changed to suit business requirements.
As part of the ENTRYPOINT process, a self-signed SSL certificate is generated. Both the NGINX server_name directive and the Common Name (CN) field in the SSL certificate have been uniformly set to ‘localhost‘. It is imperative to underscore that such a configuration is unsuitable for production environments.
The Development mode configuration does not contain an NGINX service. The entrypoint into CKAN is the actual CKAN container itself
Relationship between the ckan-docker and ckan-docker-base GitHub repositories
The relationship between the ckan-docker GitHub repository and the ckan-docker-base repository is that the latter serves as the foundation for the former. Essentially, ckan-docker-base contains the essential configurations, dependencies, and infrastructure required to build base Docker images for CKAN. These base images provide a standardised starting point for deploying CKAN instances within Docker containers. The ckan-docker repository then builds upon this base by incorporating additional configurations, customizations, and services tailored for specific CKAN deployment scenarios. In summary, ckan-docker-base establishes the fundamental building blocks, while ckan-docker extends and customises these to create fully functional CKAN Docker environments.
You can override the main configuration files (Dockerfile, prerun.py and start_ckan.sh) from ckan-docker-base within the downloaded i.e. cloned ckan-docker directory structure. There is no need to create your own (local) modified ckan-docker-base base image
Related video: CKAN 2.10 install with Docker on Ubuntu 22.04
This video shows you how to install CKAN 2.10 from package. This is the quickest and easiest way to install CKAN, but it requires Ubuntu 20.04 or 22.04 64-bit. If you’re not using any of these Ubuntu versions, or if you’re installing CKAN for development, you should watch Installing CKAN from source instead.
If you would like to learn more about CKAN and how you can establish developer operations to support your data portal projects please get in touch.
About Brett Jones
With a 30-year tenure in the tech industry, Brett Jones brings a wealth of experience across the globe. His career has traversed six international cities: Wellington, Sydney, Melbourne, New York, San Francisco, and Berlin, with an additional stop in Dhahran, Saudi Arabia. Throughout his journey, he has donned various hats at three tech giants – BEA Systems, Sun Microsystems, and Hewlett Packard. His expertise spans across diverse roles, including developer, solution architect/design, systems engineering, DevOps, and integration.
Highlights of Brett’s impressive career include working on the trading floor at 60 Wall Street during the dot-com boom, experiencing the heart of Silicon Valley, and dedicating the last five years to the New Payments Platform (NPP) project in Sydney. His recent focus areas have been build automation, bespoke tool creation, application performance monitoring, and data engineering and analysis.


